
How to use Whal3s Checkout Modal
Prerequisites
Before we start, ensure that you have Node.js and npm installed on your machine. If not, visit the official Node.js website and follow the download instructions.
Furthermore you need a Wallectconnect account and an Alchemy account.
Finally you need a Whal3s Utility. To do so, just follow this guide:
Setup
Create new Project
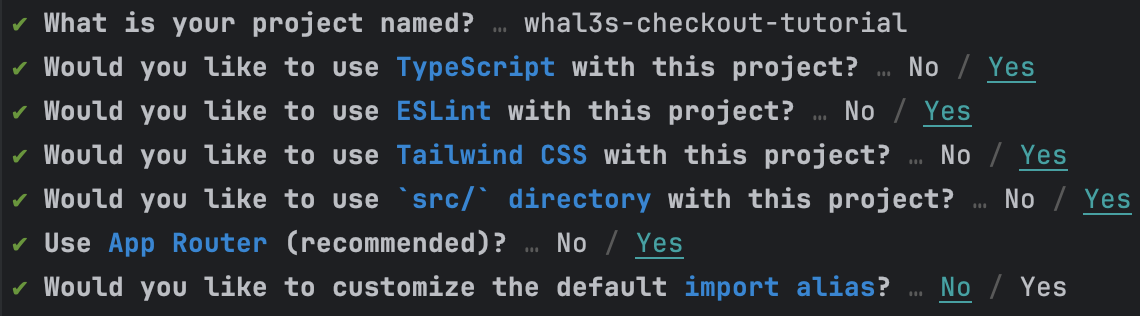
To create a new Next.js application, we'll use the create-next-app command. Next.js is a popular framework for building React applications that support server-side rendering.
npx create-next-app
When prompted, choose all default settings. Your project directory will be set up with the necessary files and folders.
Install dependencies
Navigate to the newly created project directory (replace "whal3s-checkout-project" with the name of your project directory) and install the project dependencies.
cd whal3s-checkout-project
npm install
Add Whal3s to your project
We'll use 4 Whal3s packages
- @whal3s/whal3s.js
- Core functionallity
- @whal3s/react
- Whal3s react components (Modal)
- @whal3s/react-connectkit
- A Whal3s react component that interacts with connectkit
- @whal3s/wagmiprovider
- Connectkit works with wagmi. To let wagmi communicate with the whal3s.js library, we need the wagmi provider
npm install @whal3s/whal3s.js @whal3s/react @whal3s/wagmiprovider @whal3s/react-connectkit
Configure environment variables
- Visit WalletConnect, create a new project, and copy the project id. WalletConnect is a protocol for connecting dApps to mobile Wallets using end-to-end encryption by scanning a QR code.
- Visit Alchemy, create an app, and copy the api key.
Paste the copied project id and API key into a new .env.local file in your root directory:
WALLETCONNECT_PROJECT_ID=your_project_id_here
ALCHEMY_API_KEY=your_api_key_here
(Replace your_project_id_here and your_api_key_here with your actual project ID and API key.)
Implementation
Configure Context
Next, we'll create a new component src/components/Providers.tsx. This component sets up the configuration for our application, including our WalletConnect project ID and Alchemy API key.
This component also sets up a Whal3sModalProvider and a WagmiProvider. The Whal3sModalProvider allows us to display a Whal3s Modal to the user and manages the state of the connected utility, while the WagmiProvider is used to interact with the users wallet.
Here's the code for src/components/Providers.tsx. Be sure to replace the placeholder values for the app name, app description, app URL, and app icon with your actual values:
"use client"
import React from 'react';
import {createConfig, useAccount, WagmiConfig} from "wagmi";
import {mainnet} from "wagmi/chains";

import {ConnectKitProvider, getDefaultConfig} from "connectkit"

import {Whal3sModalProvider} from "@whal3s/react"
import {WagmiProvider} from "@whal3s/wagmiprovider";
import {watchAccount} from "@wagmi/core";

const chains = [ mainnet];


// find more informations on how to configure wagmi on https://wagmi.sh/react/config
const config = createConfig(
    getDefaultConfig({
        // Required API Keys
        alchemyId: process.env.ALCHEMY_API_KEY, // or infuraId
        walletConnectProjectId: process.env.WALLETCONNECT_PROJECT_ID ?? '',

        chains: chains,
        // Required
        appName: "Your app name",

        // Optional
        appDescription: "Your app description",
        appUrl: "https://www.whal3s.xyz", // your app's url
        appIcon: "https://whal3s-assets.s3.eu-central-1.amazonaws.com/logos/Whal3s_black.png", // your app's icon, no bigger than 256x256px (max. 512KB)
    }),
);


interface ProviderProps {
    utilityId?: string
    modalImage?: string
    children: React.ReactNode
}
const ConfiguredWhal3sDemoProvider = ({children, utilityId, modalImage}:ProviderProps) => {
    const account = useAccount();
    const wagmiProvider = new WagmiProvider(account)

    const unwatch = watchAccount((account) => {
        wagmiProvider.setAccount(account)
    })


    return (<Whal3sModalProvider utilityId={utilityId ?? 'fallback utility id'}
                                 modalImage={modalImage ?? 'https://picsum.photos/482/560'}
                                 provider={wagmiProvider}>{children}</Whal3sModalProvider>)
}

const Providers = ({children, utilityId, modalImage}:ProviderProps) => {
    return (
        <WagmiConfig config={config}>
            <ConnectKitProvider>
                <ConfiguredWhal3sDemoProvider utilityId={utilityId} modalImage={modalImage}>
                    {children}
                </ConfiguredWhal3sDemoProvider>
            </ConnectKitProvider>
        </WagmiConfig>
    );
};

export default Providers;

export {config as HomepageWagmiConfig};
Please note that you can find more information on how to configure wagmi on their official guide.
Implement Whal3s context
Next, we'll modify the src/app/page.tsx file to use the Providers component we just created. This component wraps our application and provides context that will be used throughout the app.
import Providers from "@/components/Providers";

export default function Home() {
  return (
    <main className="flex min-h-screen flex-col items-center justify-between p-24 bg-white text-black">
      <div className="w-full max-w-5xl">
       <Providers
       modalImage={'https://picsum.photos/482/560'} //Change this to your image
       utilityId={'your-utility-id'} // Change this to your utility id
       >
            Your app here
       </Providers>
      </div>
    </main>
  )
}
Create Claim component
Now, let's create a Claim component in src/components/Claim.tsx. This component will use the Whal3sConnectKitButton, which provides a button that users can click to connect their wallet.
'use client'
import React, {useContext} from 'react';
import {Whal3sConnectKitButton} from "@whal3s/react-connectkit";
import "@whal3s/react-connectkit/lib/index.css"
import "@whal3s/react/lib/index.css"
import {Whal3sModalContext} from "@whal3s/react";
import {NftValidationUtility} from "@whal3s/whal3s.js";

const Claim = () => {
    const {state, dispatch} = useContext(Whal3sModalContext);

    return (
        <div
            className="space-y-12">

            <Whal3sConnectKitButton
                isClaimed={state.step >= NftValidationUtility.STEP_RESERVED}
                onClaim={() => {
                    dispatch({type: 'SET_OPEN', payload: true})
                }
                }/>

            {state.step >= NftValidationUtility.STEP_RESERVED
                && state.step < NftValidationUtility.STEP_CLAIMED
                &&  'Add form component here'}
            {state.step === NftValidationUtility.STEP_CLAIMED && 'Add success component here'}

        </div>
    );

};

export default Claim;
Create Form component
Next, we'll create a Form component in src/components/Form.tsx. This form collects some user information. Additionally it makes use of the Whal3s Modal context and handles the claim for us. To do so, the Whal3s SDK provides a storeEngagement method that can be called with additional data in JSON format. This prompts the user to sign a message and stores an engagement including the additionally provided data to the Utility.
import React, {useContext, useState} from 'react';
import {Whal3sModalContext} from "@whal3s/react";

const Form = () => {

    const {state, dispatch} = useContext(Whal3sModalContext);

    const [userDetails, setUserDetails] = useState({
        firstName: '',
        lastName: '',
    });

    const claim = async () => {
        await state.utility.storeEngagement(userDetails)
    }

    return (
        <form>

            <div className="border-b border-gray-900/10 pb-12">
                <h2 className="text-base font-semibold leading-7 text-gray-900">Personal Information</h2>
                <p className="mt-1 text-sm leading-6 text-gray-600">Use a permanent address where you can receive
                    mail.</p>

                <div className="mt-10 grid grid-cols-1 gap-x-6 gap-y-8 sm:grid-cols-6">
                    <div className="sm:col-span-3">
                        <label htmlFor="first-name" className="block text-sm font-medium leading-6 text-gray-900">
                            First name
                        </label>
                        <div className="mt-2">
                            <input
                                type="text"
                                name="first-name"
                                id="first-name"
                                autoComplete="given-name"
                                value={userDetails.firstName} onChange={(e) => {
                                setUserDetails({...userDetails, firstName: e.target.value})
                            }}
                                className="block w-full rounded-md border-0 py-1.5 text-gray-900 shadow-sm ring-1 ring-inset ring-gray-300 placeholder:text-gray-400 focus:ring-2 focus:ring-inset focus:ring-indigo-600 sm:text-sm sm:leading-6"
                            />
                        </div>
                    </div>

                    <div className="sm:col-span-3">
                        <label htmlFor="last-name" className="block text-sm font-medium leading-6 text-gray-900">
                            Last name
                        </label>
                        <div className="mt-2">
                            <input
                                type="text"
                                name="last-name"
                                id="last-name"
                                autoComplete="family-name"
                                value={userDetails.lastName} onChange={(e) => {
                                setUserDetails({...userDetails, lastName: e.target.value})
                            }}
                                className="block w-full rounded-md border-0 py-1.5 text-gray-900 shadow-sm ring-1 ring-inset ring-gray-300 placeholder:text-gray-400 focus:ring-2 focus:ring-inset focus:ring-indigo-600 sm:text-sm sm:leading-6"
                            />
                        </div>
                    </div>

                </div>
            </div>
            <div className="mt-6 flex items-center justify-end gap-x-6">
                <button
                    type="button"
                    onClick={claim}
                    className="rounded-md bg-indigo-600 px-3 py-2 text-sm font-semibold text-white shadow-sm hover:bg-indigo-500 focus-visible:outline focus-visible:outline-2 focus-visible:outline-offset-2 focus-visible:outline-indigo-600"
                >
                    Submit
                </button>
            </div>
        </form>

    );
};

export default Form;
Create Success component
The Success component in src/components/Success.tsx displays a message to the user once they have successfully claimed their experience.
import { CheckCircleIcon } from '@heroicons/react/20/solid'

export default function Success() {
    return (
        <div className="rounded-md bg-green-50 p-4">
            <div className="flex">
                <div className="flex-shrink-0">
                    <CheckCircleIcon className="h-5 w-5 text-green-400" aria-hidden="true" />
                </div>
                <div className="ml-3">
                    <p className="text-sm font-medium text-green-800">Successfully claimed</p>
                </div>
            </div>
        </div>
    )
}
Bring all together
Now, we need to integrate the Form and Success components into the Claim component. Update src/components/Claim.tsx with the following:
'use client'
import React, {useContext} from 'react';
import {Whal3sConnectKitButton} from "@whal3s/react-connectkit";
import "@whal3s/react-connectkit/lib/index.css"
import "@whal3s/react/lib/index.css"
import {Whal3sModalContext} from "@whal3s/react";
import {NftValidationUtility} from "@whal3s/whal3s.js";
import Form from "@/components/Form";
import Success from "@/components/Success";

const Claim = () => {
    const {state, dispatch} = useContext(Whal3sModalContext);

    return (
        <div
            className="space-y-12">

            <Whal3sConnectKitButton
                isClaimed={state.step >= NftValidationUtility.STEP_RESERVED}
                onClaim={() => {
                    dispatch({type: 'SET_OPEN', payload: true})
                }
                }/>

            {state.step >= NftValidationUtility.STEP_RESERVED
                && state.step < NftValidationUtility.STEP_CLAIMED
                &&  <Form/>}
            {state.step === NftValidationUtility.STEP_CLAIMED && <Success/>}

        </div>
    );
    1
};

export default Claim;
Next, add the Claim component to your page. Update src/app/page.tsx as follows:
import Providers from "@/components/Providers";
import Claim from "@/components/Claim";

export default function Home() {
  return (
    <main className="flex min-h-screen flex-col items-center justify-between p-24 bg-white text-black">
      <div className="w-full max-w-5xl">
       <Providers
       modalImage={'https://picsum.photos/482/560'} //Change this to your image
       utilityId={'your-utility-id'} // Change this to your utility id
       >
            <Claim/>
       </Providers>
      </div>
    </main>
  )
}
Don't forget to insert you Utility ID
Wrap Up
You've successfully built a Next.js application that let's user claim a utilit using Whal3s. You can now run your application locally using the npm run dev command.
If you have any questions or run into issues, feel free to raise an issue on this GitHub repository or reach out on the Whal3s team. Happy coding!
Next steps
Head over to your utility in the Whal3s App. After you have claimed the Utility you will see the engagement in the engagements list below the Utility details.
You can also export them to CSV by using the export button.
Updated 10 months ago